
Bracelet photography opens up many opportunities to get creative and take stunning shots. Whether you shoot product-only photos or use props and models, you can create unique compositions that impress clients and help them drive sales.
Are you dipping your toes in bracelet product photography and want to master it quickly? We’ve compiled a list of the essential bracelet photoshoot tips (including using AI), techniques, equipment, and examples for inspiration. Before diving in, let’s see how to approach snapping shots of bracelets for ecommerce.
In this article
How To Approach Photographing Bracelets for Ecommerce

Your approach to bracelet photography for ecommerce will depend on the project. For instance, the photo above can be a perfect hero image for an online jewelry store or its print material like a brochure.
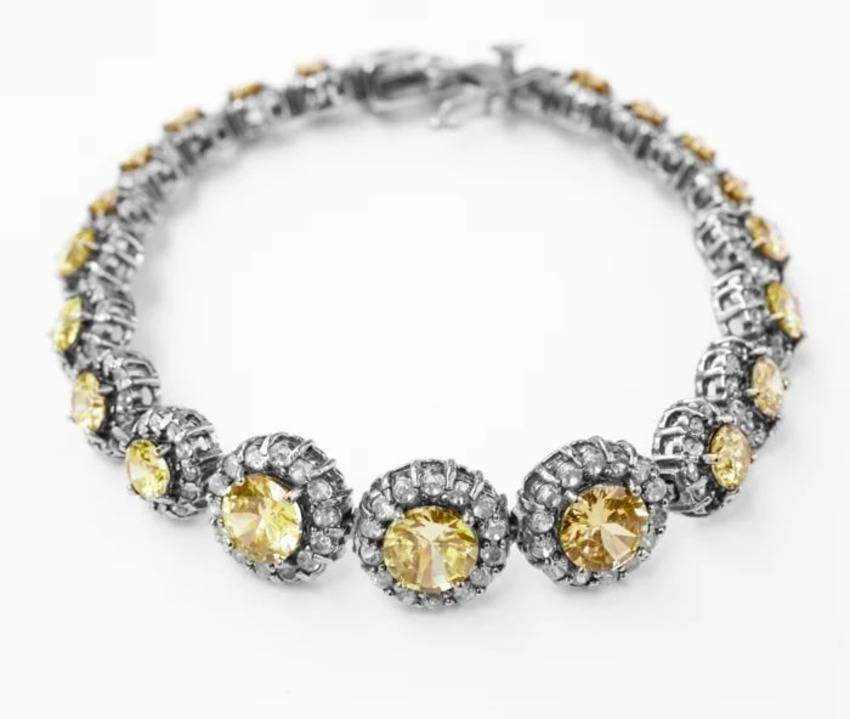
On the other hand, photographing a bracelet on a white background with or without props works best for an online product catalog. It highlights the features without distractions, putting the jewelry into the spotlight.
Of course, your clients might have different requirements. Still, combining these two approaches in your portfolio (along with lifestyle photography) will showcase your versatile skills, creativity, and talent.
As for an actual bracelet photoshoot, you’ll need proper lighting and equipment for optimal lighting control. That’s vital for silver and gold bracelet photography since precious metals are highly reflective and produce glare in photos. The same goes for gemstones, primarily sparkling diamonds.
Then, there’s color representation, which requires utmost accuracy. Capturing accurate bracelets’ metal shades and gemstone colors is crucial for ecommerce sales.
These are only some bracelet photoshoot aspects we’ll address below to help you ace this photography type. Let’s get to it.
9 Essential Bracelet Photoshoot Tips
The following tips are an excellent starting point if you need essential tricks to level up your photography game or inspiring images to spark bracelet photoshoot ideas.
1. Use a Micro Lens for Your Bracelet Photoshoot
Bracelet photography (like other jewelry photography types) requires macro shots—product close-ups highlighting the details. A macro lens is perfect for those since it lets you get closer to the subject without physically approaching it. Its short focal length enables you to take crisp photos from a convenient distance.
However, taking macro shots means working with a shallow depth of field. Some parts of a bracelet can get out of focus, like in the image above. That photo still works because it highlights the crucial features, but you can use focus stacking and edit the shots in post-production to deepen the depth of field.
Read more: best lens for jewelry photography
2. Put Your Camera on a Tripod
A tripod is crucial for a bracelet photography setup because it prevents blurry images. Whether you have unsteady hands or want to ensure consistency regarding shooting angles, invest in a tripod and say goodbye to your camera shaking whenever you press the shutter.
Speaking of which, a remote shutter release is another excellent addition to your bracelet photography kit. It activates the shutter remotely, amplifying your camera stabilization efforts.
3. Set Up Your Focus and Aperture
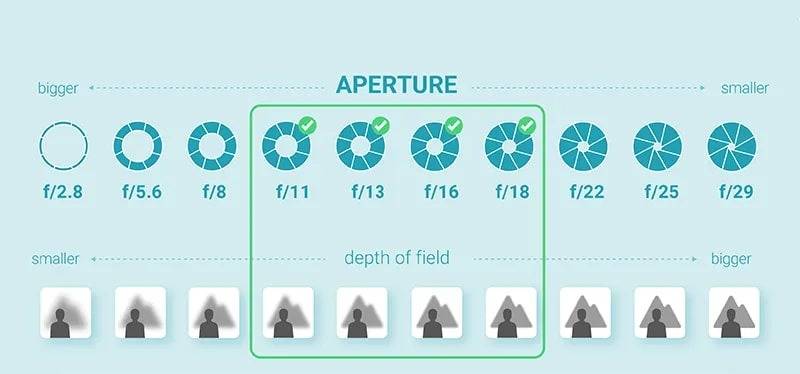
You’ll need a wide aperture (around f/8) to capture intricate details in product close-ups. That gives you a sharper focus on the jewelry highlights.
However, narrow it between f/11 and f/16 (the higher the f-stop value, the narrower the aperture) to increase the depth of field and take crisp jewelry shots without blurry edges. That puts everything within the frame in focus.
Experiment with your camera’s aperture to see what works best for various pieces and backgrounds—and don’t forget the shutter speed and ISO settings for maximum dynamic range.
4. Use a White Background
Bracelet photography for ecommerce typically requires a white backdrop. That’s an unwritten rule for dedicated product pages because it highlights the jewelry without distracting viewers with unique compositions.
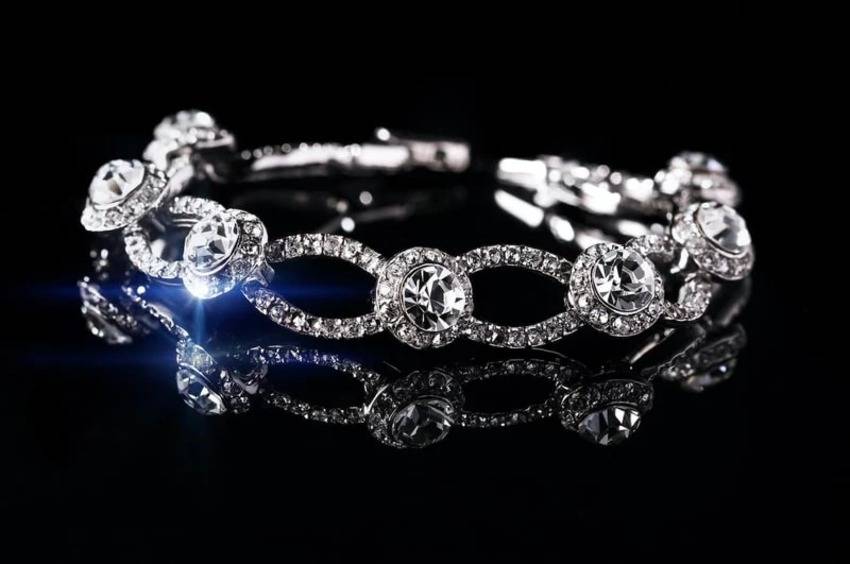
However, you can use a black background for an ecommerce store’s print material or hero images to add drama and elegance. Here’s an excellent example of a black reflective surface adding more brilliance, sparkle, and style to a diamond bracelet.
5. Adjust Lighting Correctly
Natural light is the best lighting for bracelet product photography, so use it as much as possible to snap quality shots. They’ll have a soft, uniform glow, making the jewelry more visually appealing. You’ll take the best photos near a window, positioning the jewelry 90° to the left or right.
As for artificial lighting like LED lights, position it at a 45° angle relative to the jewelry to reduce glare and shadows.
Whether your light source is natural or artificial (never use both simultaneously), control it with diffusers, reflectors, and light modifiers. That way, you’ll soften the light reaching your subject while minimizing shadows and glare.
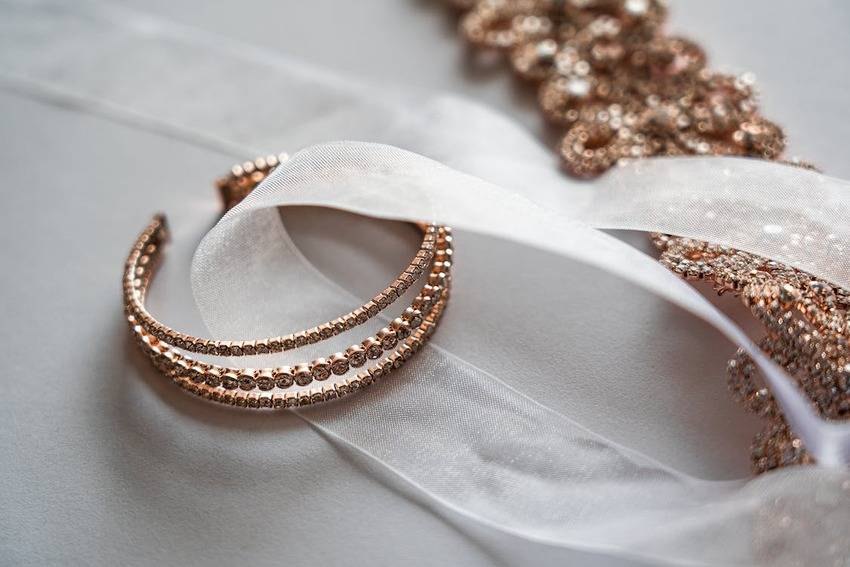
6. Arrange Props and Bracelets

Bracelet photoshoot props for ecommerce typically include bracelet holders or stands, like in the image above. They enhance the overall presentation and make the bracelets stand out. However, the key is to use fewer props and focus on the jewelry.
That said, you can use natural elements like seashells (perfect for photographing pearl bracelets), sand, foliage, wood, marble, or flower petals—anything complementing the jewelry without drawing attention away.
7. Use a Lightbox

Jewelry photographers increasingly use lightboxes—empty boxes with translucent, reflective panels for illuminating products from all angles while diffusing the light and minimizing shadows. They’re ideal for photographing small items, including bracelets, ensuring optimal lighting control.
Some lightboxes even have props for positioning products (e.g., bracelet holders and earring stands). Also, some allow opening the sides or top to leverage more than the front-view angle.
Read more: best lightbox for jewelry photography
8. Leverage Different Angles During a Bracelet Photoshoot
Besides experimenting with light source direction to increase brightness, reduce shadows, and add depth to bracelet photos, leverage multiple camera angles to provide more variety.
Shooting bracelet photos from various perspectives adds flair to an ecommerce product catalog. Additionally, it builds trust since consumers can inspect items from all angles to ensure they’re impeccable and make wise purchasing decisions.
9. Use AI to Perfect Images

AI tools can enhance your bracelet photography efforts, helping you generate and edit images to make them more visually appealing and save time.
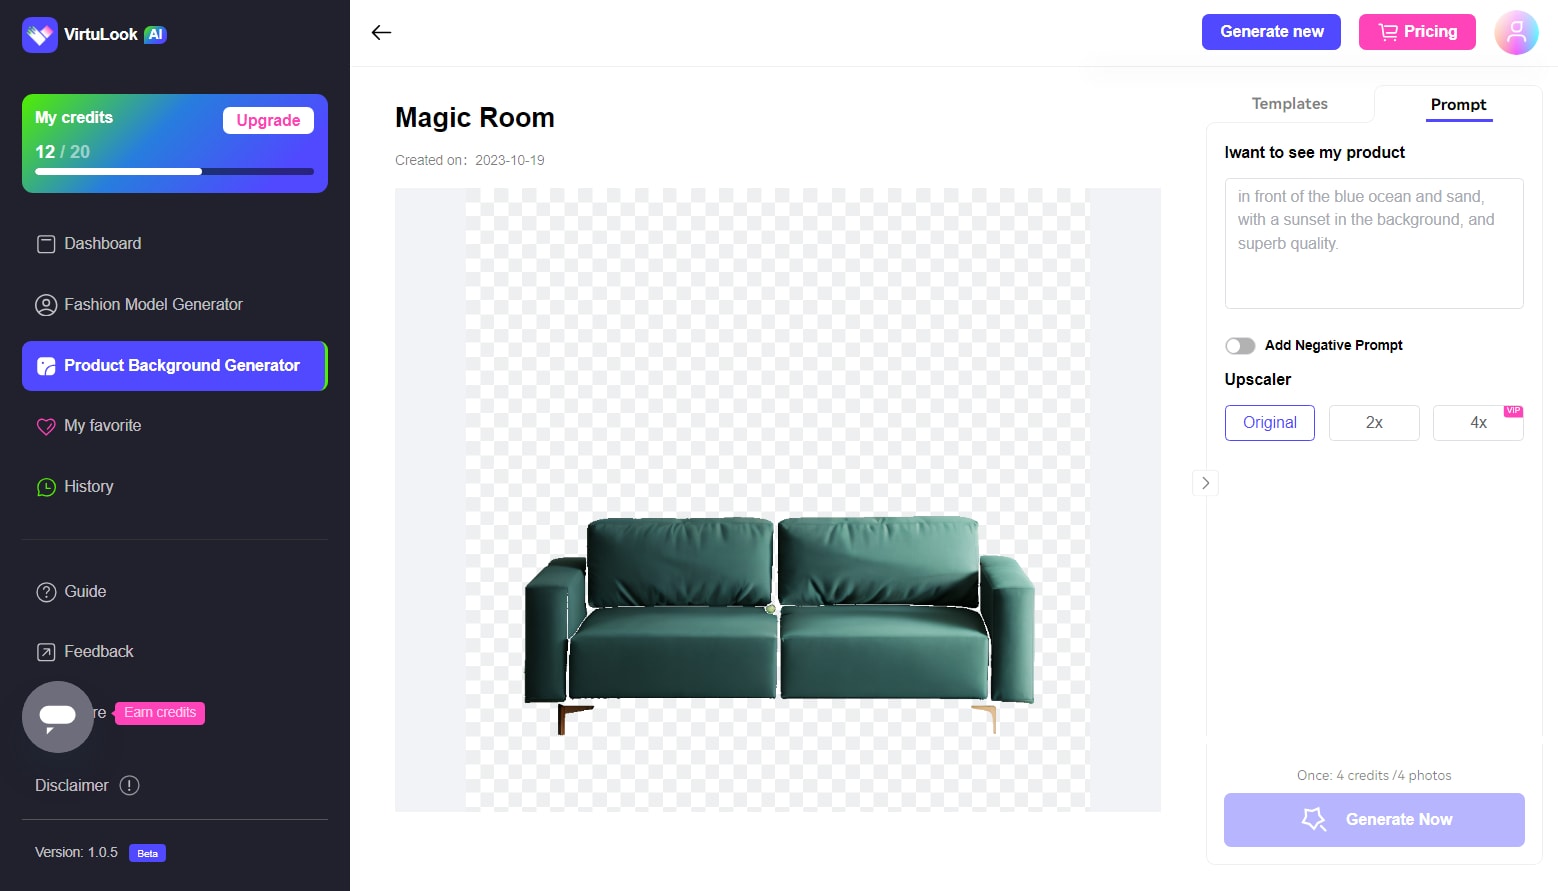
For instance, Wondershare VirtuLook can generate AI product photos in 4K within seconds, letting you choose camera angles, lighting, backgrounds, and other features. It doesn’t create them from scratch—it requires sample product photos to fine-tune them according to your preferences.
Here's how to perfect your images with Wondershare VirtuLook:
- Step 1: Visit Wondershare VirtuLook and register an account.

- Step 2: Log in, click Product photo generation to upload reference photos. Once uploaded, VirtuLook will automatically segment the target photo.
- Step 3: Enter Magic Room. Change the background types for your bracelet under Using Template.

Alternatively, if the template does not currently have the scene you need, you can try using the Custom Editing feature to generate your own customized photo.
How To Photograph Different Types of Bracelets
Bracelet product photography is about showcasing jewelry in the best way to make consumers fall in love with them. However, what works for bangles may not suit pearls.
Here is how to photograph a bracelet, depending on the type.
Stiff Chain Bracelets
Flat-lay photography (from a top-down perspective) doesn’t work for stiff chain bracelets—unless they have clasps or other closures you can open to shoot them from above. However, you’ll do them more favor if you photograph them closed.
Place a closed stiff chain bracelet on a tabletop and position your camera at a 5–25° angle for the most flattering shot, like in the photo above. However, you can capture a front-view image when photographing a tennis bracelet or one with a similar design, ensuring viewers can see the back.
Chain Bracelets

Chain bracelets allow more variety. You can photograph them directly from above or position your camera at a 45–65° angle relative to the tabletop, like in the photo above. The key is to ensure they form an even, round shape.
However, if a chain bracelet has intricate details, you can showcase them in multiple close-up shots so that each captures a specific bracelet part.
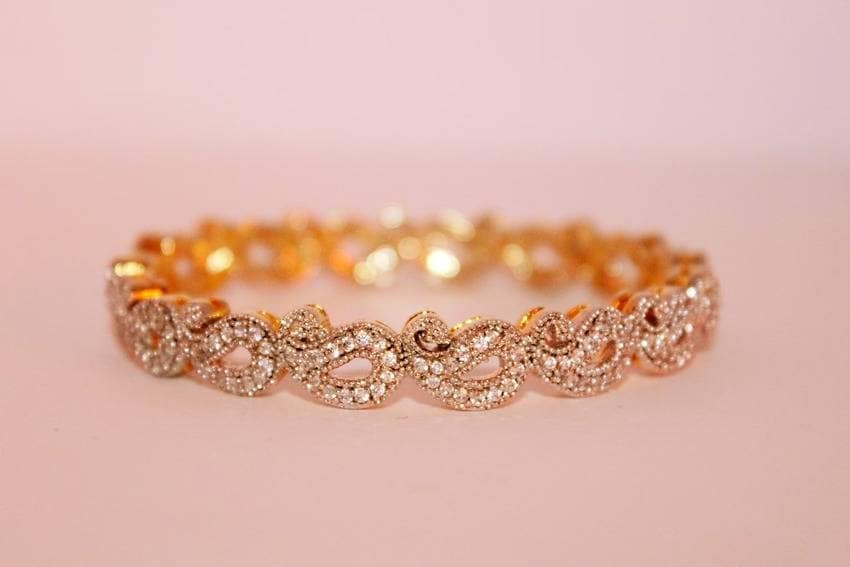
Bangles
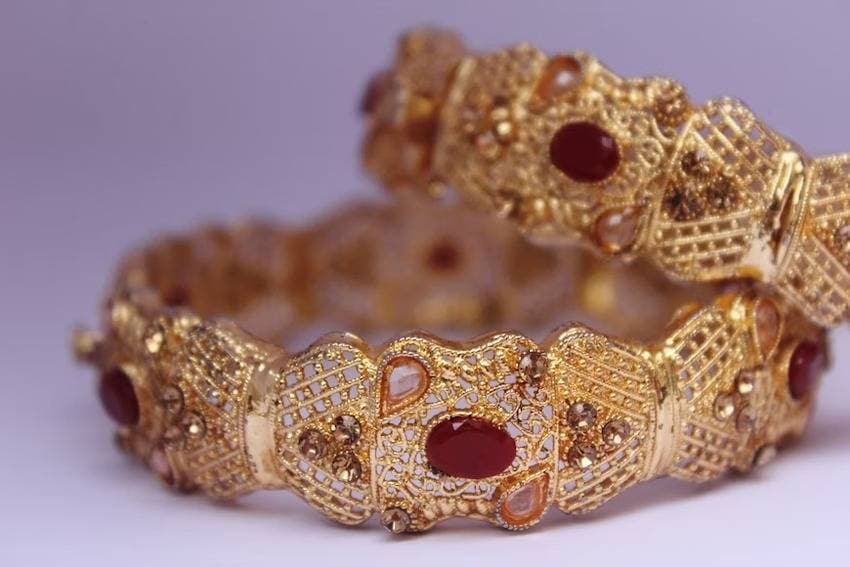
Bangles are the most straightforward bracelets to photograph since they can sit flat on your tabletop so you can get a front-view shot, perfect for showcasing intricate details. Additionally, you can position them upright for a top-view image, but you’ll need props or double-sided tape to keep them in place before editing those out in post-processing.
Flat-lay photography works for thin bangles (like in the image below), but a 45–65° angle can also do the trick. Additionally, when photographing bangles with pendants, you can hang them with props and edit those out in post-production.

Pearl Bracelets
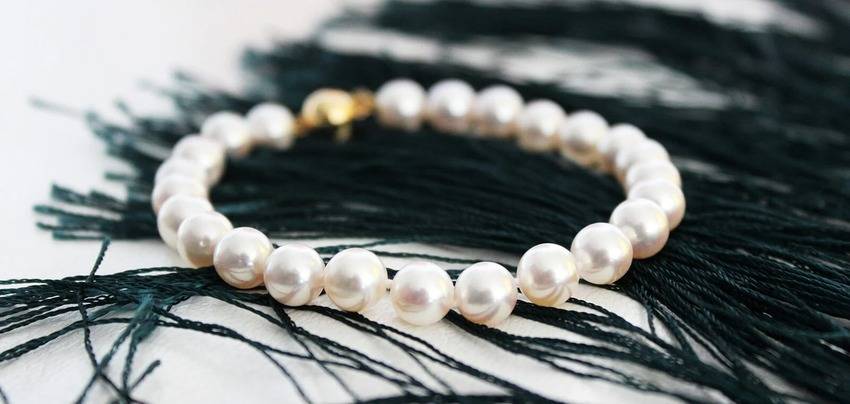
The best way to photograph a pearl bracelet is to place it closed on your tabletop (ensuring it forms a round shape) and take a shot from slightly above (at a 10–15° angle). That way, you’ll achieve a professional look with the bracelet pleasing to the eye. Learn more about peals photoshoot.
Conclusion
Bracelet product photography can be pretty exciting, even when snapping shots for ecommerce, which doesn’t leave much room for creative compositions. The sheer number of different designs means every photo can be unique, helping you build an impressive portfolio.
Therefore, apply our tips and techniques, draw inspiration from our bracelet photography ideas, and utilize AI tools like Wondershare VirtuLook to cut editing time and create professional-quality shots that sell.